What is the Issue modal?
The Issue modal provides a convenient way for agents to take the Issue from submission to resolution. It allows agents to perform all the necessary steps, such as communicating with the Customer or escalating and resolving an Issue—all from the same modal. This is where you can get details on an issue, communicate with a merchant, and perform Issue actions such as snooze or resolve.
General Icons
 : switch between recently minimized Issues.

 : open/close the Issue chatroom.
 : refresh the Issue modal.
 : minimize an Issue modal.
 : close an Issue modal.
Left navigation bar tabs
 (Issue Details): a detailed Issue profile that includes Public and Private chatrooms and Issue transitions buttons. This is the homepage of an issue and where the majority of documentation on the Issue will take place. This is also where the chat room is so you can communicate with the merchant or other Relay users on a ticket. Learn more below.
  (Issue Ownership): information about Sponsor and Owner Teams, Owner User, and Collaborating Users and Teams. You can also update the owner and collaborating User/Team information here.
 (Issue Log): view information about changes and actions on the Issue, including escalation notes, Issue updates, and User notes.
  (Notification Logs): view Issue communications sent to Relay Users and the Customer.
  (Network & Site Health): view the Location-specific network and site health dashboard.
  (Billing): if your Organization has billing from Relay set up, you can log work orders, training, and paid support items here.
 (Shipments): view and add shipments related to the Issue.
 (Checklists): view and fill out checklists related to the Issue.
  (Files): attach relevant documents, such as a hardware shipping form or photos of work.
  (Sub-Issues): add and view sub-Issues to your parent Issue.
Information card
The information card in the Issue modal is similar to the information card in Issues list, with some additional customizations and a counter of Time on Issue. Follow the screenshot below to learn more.

- Issue source icon: quickly identify the channel the Issue came through.
- Customer Location: click on the title to view more information about the Location.
- (optional) Issue name: name your Issue by clicking on
 (Pencil). This name will be also visible in Issues list. NOTE: you can also edit the name on the right side of the Issue modal in the Issue Edit section.
 - Reference ID: the unique 6-character identifier for the Issue. You can search for an Issue using its RefID.
- Issue status & Date created: lists Issue status and the date and time it was created. The color of the frames depends on the Issue status.
Public & Private Chatrooms
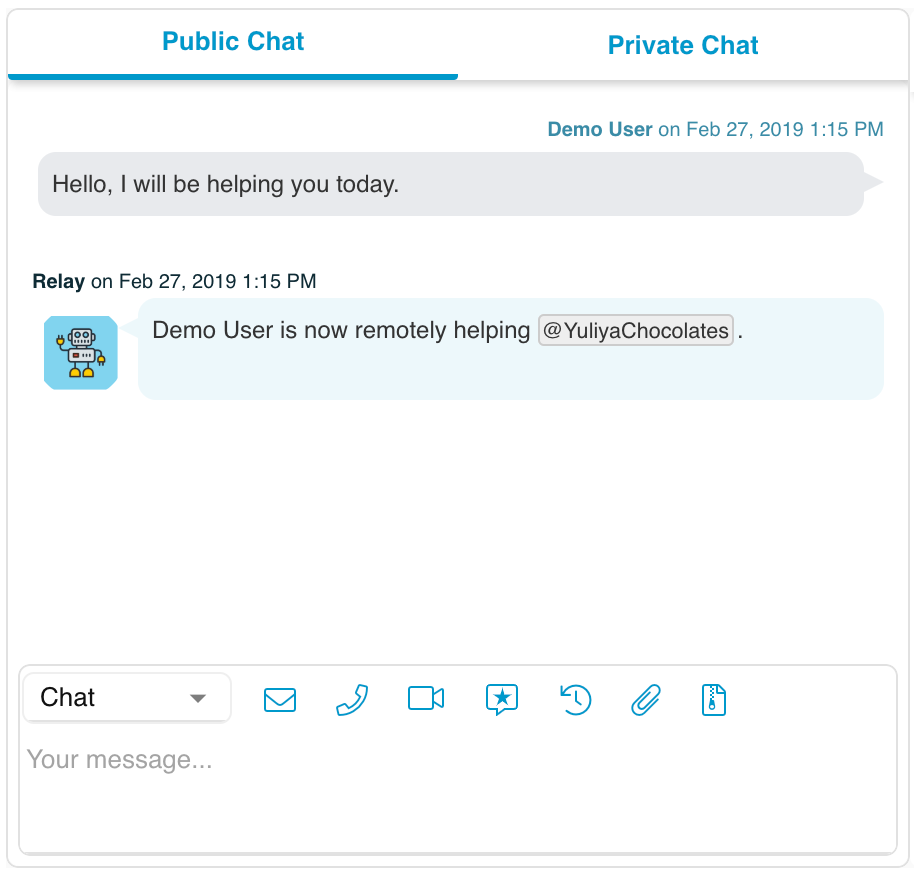
The Issue chatroom provides a convenient way for agents to interact with Customers and colleagues through multiple channels, such as chat, SMS, email, or video call—all in the same chat window. Public Chat allows agents to interact with Customers and Private Chat allows agents in Relay to collaborate on the Issue. Click here to learn more about the chat section of the Issue modal.

Issue action buttons

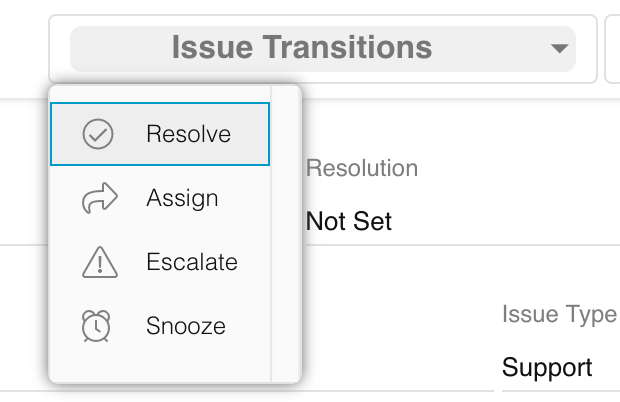
Click on the Issue transitions buttons on the right side of the Issue profile to perform the following actions on the Issue:
- Resolve: resolve an Issue.
- Assign: assign or reassign an Owner User/Team on the Issue. Change the Customer assigned to the Issue. Add collaborators on the Issue.
- Escalate: bring attention to a specific Issue and make sure it gets to the right Team(s).
- Snooze: temporarily remove Issues that you do not need to address immediately from your Issues inbox.
NOTE: users with smaller screens will not see the row of action buttons. Instead they will first need to click on the Issue Transitions button.

Issue Edit section
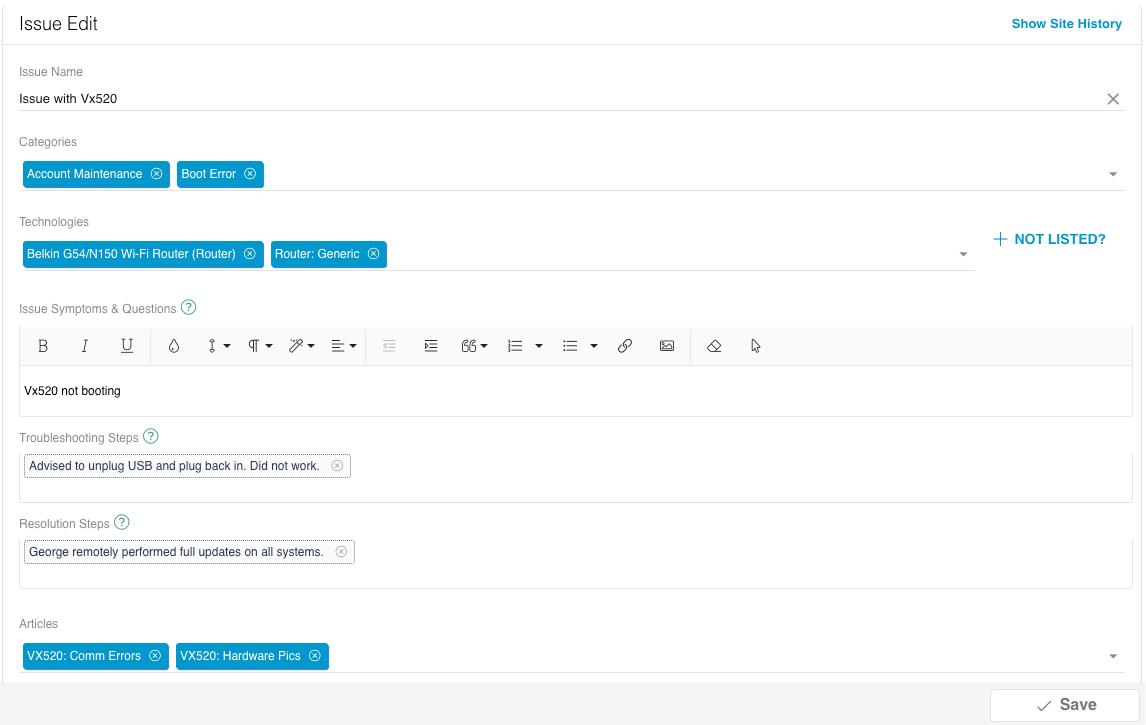
The Issue Edit allows you to go into more detail about the Issue diagnostics and and steps towards resolution. Follow the screenshots below to learn more about Issue Edit.

- Show Site History: view the Issue history for the Customer Location.
- Issue Name: name your Issue.
- Categories: select or search for one or more Issue category tags (configured at the Organization level) from the dropdown that describe the merchant's Issue. For example, you can select Windows Error and Account Update.
- Technologies: from the dropdown, select device(s) or software that the Customer is having issues with. Only technology that has previously been associated with this Customer Location will be listed.
- If you do not see the correct device, click the Not Listed? button and select a device from the Type field and click Save & Exit. Once you’ve added the device, it will be available in the drop-down for the Technologies field going forward for all new Issues at this Location.
- Issue Symptoms & Questions: describe what the Customer is having Issues with. See Writing Tips and Examples below.
- Troubleshooting Steps: describe the steps you took to troubleshoot the Issue. You will see suggestions for steps appear as you type. You can select one of those suggestions or type your own and hit Enter. This will save your step as one a suggestion for the future.
- Resolution Steps: describe the steps you took to resolve the Issue. See Writing Tips and Examples below. You will see suggestions for steps appear as you type. You can select one of those suggestions or type your own and hit Enter. This will save your step as a suggestion for the future.
- Articles: select article(s) from your Organization's Knowledge Base that were used to assist with the Customer's Issue.
Writing Step(s) Tips and Examples
Tips:
- Re-use existing statements
- Keep statements simple to promote re-use
- Be concise (avoid redundant or unnecessary words)
- Use common words (e.g. refer to customer as "customer" rather than a name)
Troubleshooting Step Examples:
- Reconnected peripherals
- Re-powered terminal
- Follow KB [Terminal Diagnosis 123]
Resolution Step Examples:
- Follow KB [Payment Processing Stuck XYZ]
- Initiated reset from Terminal Cloud